
Have you ever needed to take data from Google Sheets and import it into Google Docs? And then print that data or create things with it? For my school’s Field Day students use a Google Form to select activities. Once the activity is full, it automatically removes itself from being a choice in the Google Form (If you want to see how to do that click here). About 400 students fill out the form and from there, they each need a custom schedule that shows them their activities for the day.
Printing all of this data from Google Sheets is impossible. It’s not formatted properly, it’s difficult to read, and it’s not user-friendly for middle school students. This is when a mail merge becomes necessary. The data has to be sorted into a usable format for students so that they can easily see what they need to do and where they need to do it.
Step 1 Install the autoCrat plugin on your Google Sheets form response
You can do this by Add-ons -> Get Add-ons -> and searching for autoCrat. You can also click right here.
 Step 2 Open autoCrat
Once installed go to Add-ons. From there go to autoCrat and click on Open. A pop-up will appear and it will take a few seconds for everything to pop-up.
Note: Give this add-on time to work. It will do everything you want, it just takes a little time.
Step 3 Click on New Job

Step 4 Give Your Job a Name

Once you have given it a name click on “Next.”
Step 5 Create or Choose a Template
This is probably the most difficult step of the whole process if you haven’t done a mail merge before. To begin with, autoCrat needs a dummy Google Doc that has tags showing where to place the data at. This is just a template that will be used to generate all of the pages or other outputs that you may want. The nice thing about this is that the final output will retain all of your formatting. Text, fonts, sizes, colors, and anything else will be fully retained and the data from your Google Sheet will automatically adapt to fit what is there.

My suggestion would be to make a test version first and play with the settings.
Tags
The tags that you will need to make in your Google Docs are items that your Google Sheet will search out so that it knows where it should put given information. Tags always start with << and end with >>. The text in between is the ID or title that you will use to identify a column of your Google Sheet. In the example below, you can see all of the tags of the data that I will be using. Each tag corresponds with a column in my Google Sheet file.

Just make sure that each piece of data that you want on your Google Doc has a tag somewhere in the Doc. The tags do not need to match what the column names are inside of Google Sheet but it does make things go quicker if you do.
What I like to do is make a copy of my Google Sheet once I have the data, or at least a new sheet in the workbook, and change all of the column header names to match my tags. It makes things simpler in my mind, but it may not for you and that’s fine.
Step 6 Match the Tags with the Columns

 When you click the next button autoCrat will automatically scan your Google Doc for tags. It will then ask you to match the tags with a column from your Google Spreadsheet. If the names of the tags and columns match exactly, it will automatically get them. Otherwise, you will have to select the proper one from the dropdown list. When done, click next.
Note: You can have images or hyperlinks automatically brought in as well. You are not limited to just text. To change this go to the “standard” dropdown on the left and choose the option that fits your needs. To be honest I’ve never used anything other than standard, but I have some ideas of how this might be used. You can read about it in Step 12.
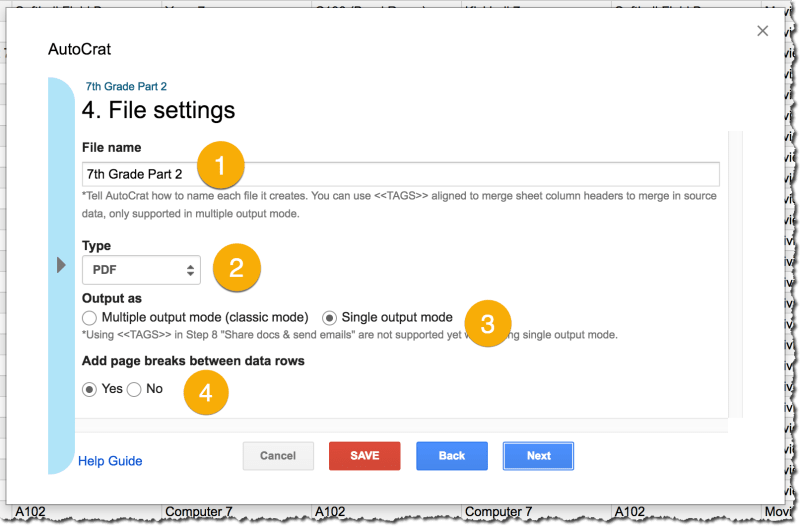
Step 7 File Settings
At this point you need to do a few things and make a few decisions:
- Give a file name to be used on the finished output
- Choose to have autoCrat output a Google Doc(s) or a PDF
- Do you want multiple outputs (one for each row) or a single output (combines everything into one file)
- Do you want a new page for each row or do you want everything to continue immedimatly after the previous row
Step 8 Destination Folder
Pick a place in your Google Drive for autoCrat to place the output.

Step 9 Dynamic Folder
autoCrat allows for you to have outputs sort to different folders based on what they call “triggers.” I’ve never used this feature and skip right on past it. If you are familiar with it, let me know in the comments.

Step 10 Conditions
You can set conditions so that only rows that meet those conditions will be output. This is again something that I haven’t had to use.

Step 11 Sharing
You can have autoCrat share the output file with others. If you would like to do that hit “yes” and follow the prompts.

Step 12 Triggers
autoCrat is able to run completely by itself if you would like. By setting up triggers you can cause an output to happen based off of the inputs to the Google Sheets. I’ve never needed to use this but you could easily make automatic certificates for passing a Google Form quiz/test.

Once you are done here click on save.
Step 13 Run the Job
The final piece of the puzzle is to run the job. After you have completed everything that autoCrat has asked for you will be taken to a new screen. From there you will see the name of your job from earlier along with four icons. The first one is a play button which allows you to run the job and produce the output you desired. The second icon allows you to edit your earlier choices. The third icon, the eye, allows you to see details of the job settings. And finally, the fourth icon, the trash can, allows you to remove the job.

Final Notes
Give autoCrat some time to work. It will take a few minutes to process your data. The larger the data set, the larger the amount of time it needs to process. I usually split my sheets up into smaller sheets that are about 100 rows in length. I’ve found that I have better luck getting an output if autoCrat is processing 100 or less rows at a time. Yes, autoCrat will totally fail sometimes, but it does such a good job when it works that I can forgive it. To save myself any frustration I almost always pair things down to make it easier on autoCrat.
If you have questions on how to use or setup autoCrat please let me know in the comments down below. I’ll try my best to answer them and provide you support.
Leave a Reply to Nathan NageleCancel reply